Thursday, September 15, 2011

A note on vegan tattooing

So, a little more than a year ago shortly after opening Goyo Tattoo, a good friend of mine Jesse Weisenfeld came to me wanting a tattoo. Jesse is an all around great guy, bio major, the son of a veterinarian (like me) and in keeping with his generally kind nature Jesse is a pretty strict vegan. Not the pushy kind, mind you, in fact most people how know him aren't even aware of his eating habits. He generally just quietly makes the non-animal choices whenever we're out and about and goes on with life. Well, being that we're good buddies, I knew that it would be important to him that my products be animal free. So, I sent out a few emails to my ink manufacturers, and surprisingly enough (or not, I'm not sure) not of my equipment contains animal products! Since most of the dyes are derived from minerals, the biggest potential contributor to animal content would be glycerin, although it doesn't HAVE to be made from animals. Turns out being a vegan-friendly tattoo studio is pretty easy. One day I'll talk about the small steps I'm taking to cut down on waste, which unfortunately there is a ton of in this industry.

Here's Jesse's tattoo, it's a sabertooth tiger skull! Sick!

Monday, September 12, 2011

Artichoke cover up tattoo

Today I'm going to share some photos from an interesting and fun cover up that we finished a few months ago. I'll show you the finished product now, then show some start to finish images detailing the process.


Rosalind came to me with the idea of using an artichoke cut in half as a cover up for her tattoo, and showed me a few example pictures that she liked. She emailed me a picture of her tattoo, and it then just played around with it a bit in photoshop using the image of the artichoke in a separate layer, and making it slightly translucent to help me get a better grasp of how it will work as a cover up. Also, I sent the mock up over to Rosalind to see what she thought and she seemed to really like it, so we continued forward.


We decided the best way to do it would be for us to go out and find some nice artichokes and have an artichoke photoshoot. So we did, and had a pretty great time of it too. Each of us took a bunch of shots, then I found one that I thought would work the best as a tattoo, and a few weeks later we got the first session done.


With just the stencil on:


After starting, ~1 hr:


And just after finishing the first session:


This whole process start to finish was I think about 2 months or so, then another month until the 2nd session, when it was finished. This finished image was taken about 2 or 3 months after that second session. We are both really happy with it!

Here it is one more time:


Sunday, September 11, 2011

Portrait in progress

So today I thought I would share something a little intimidating and scary for me, which is an in progress photograph of my very first human portrait. This is a Goyo Tattoo blogspot exclusive! Since this isn't finished yet, and is a pretty mediocre picture, I won't be posting these images to my online portfolio until I am completely satisfied with the portrait.

That said, however, I am pretty happy with our progress so far. It is on a really nice girl named Sheena, who put some faith and trust in my to tattoo a picture of her father who passed away many years ago. We started with a photograph from sometime in the 80's with the lower left half of his face missing, and in the photo his head was maybe only 1"x1". I literally used an eye loupe to examine the photograph, then spent basically the entire day before her tattoo redrawing his face with prismacolors.

This picture was taken right after we finished this session, and Sheena tends to be very prone to swelling, so it still looks a little off. Soon I hope to have healed pictures, I am thinking one more session to tighten in every last little detail, and we should be set. For this tattoo I used Kuro Sumi and Silverback black inks, Intenze white, and eternal and fusion "true" greys. I used Pulse and FK irons machines.

Saturday, September 10, 2011

Back again....

Hey so it's been almost a year since I've posted anything on here, I've found it can be pretty difficult to motivate and find topics to discuss. I think my plan will probably be to devise some kind of schedule, with topics for each day of the week that I'd like to discuss, in the hopes that this will help keep me on track.

Having my tattoo studio in Portland, Oregon has been working out well. Business is steady and I have some great clients. It can sometimes get a bit overwhelming worrying about all the artwork and keeping everyone organized and prioritized. I'm just trying to do my best and stay positive!

I just stumbled upon some pictures I took of my work space set up and ready for a tattoo, so I figured I would just share some of those photos and explain a little about what is going on.


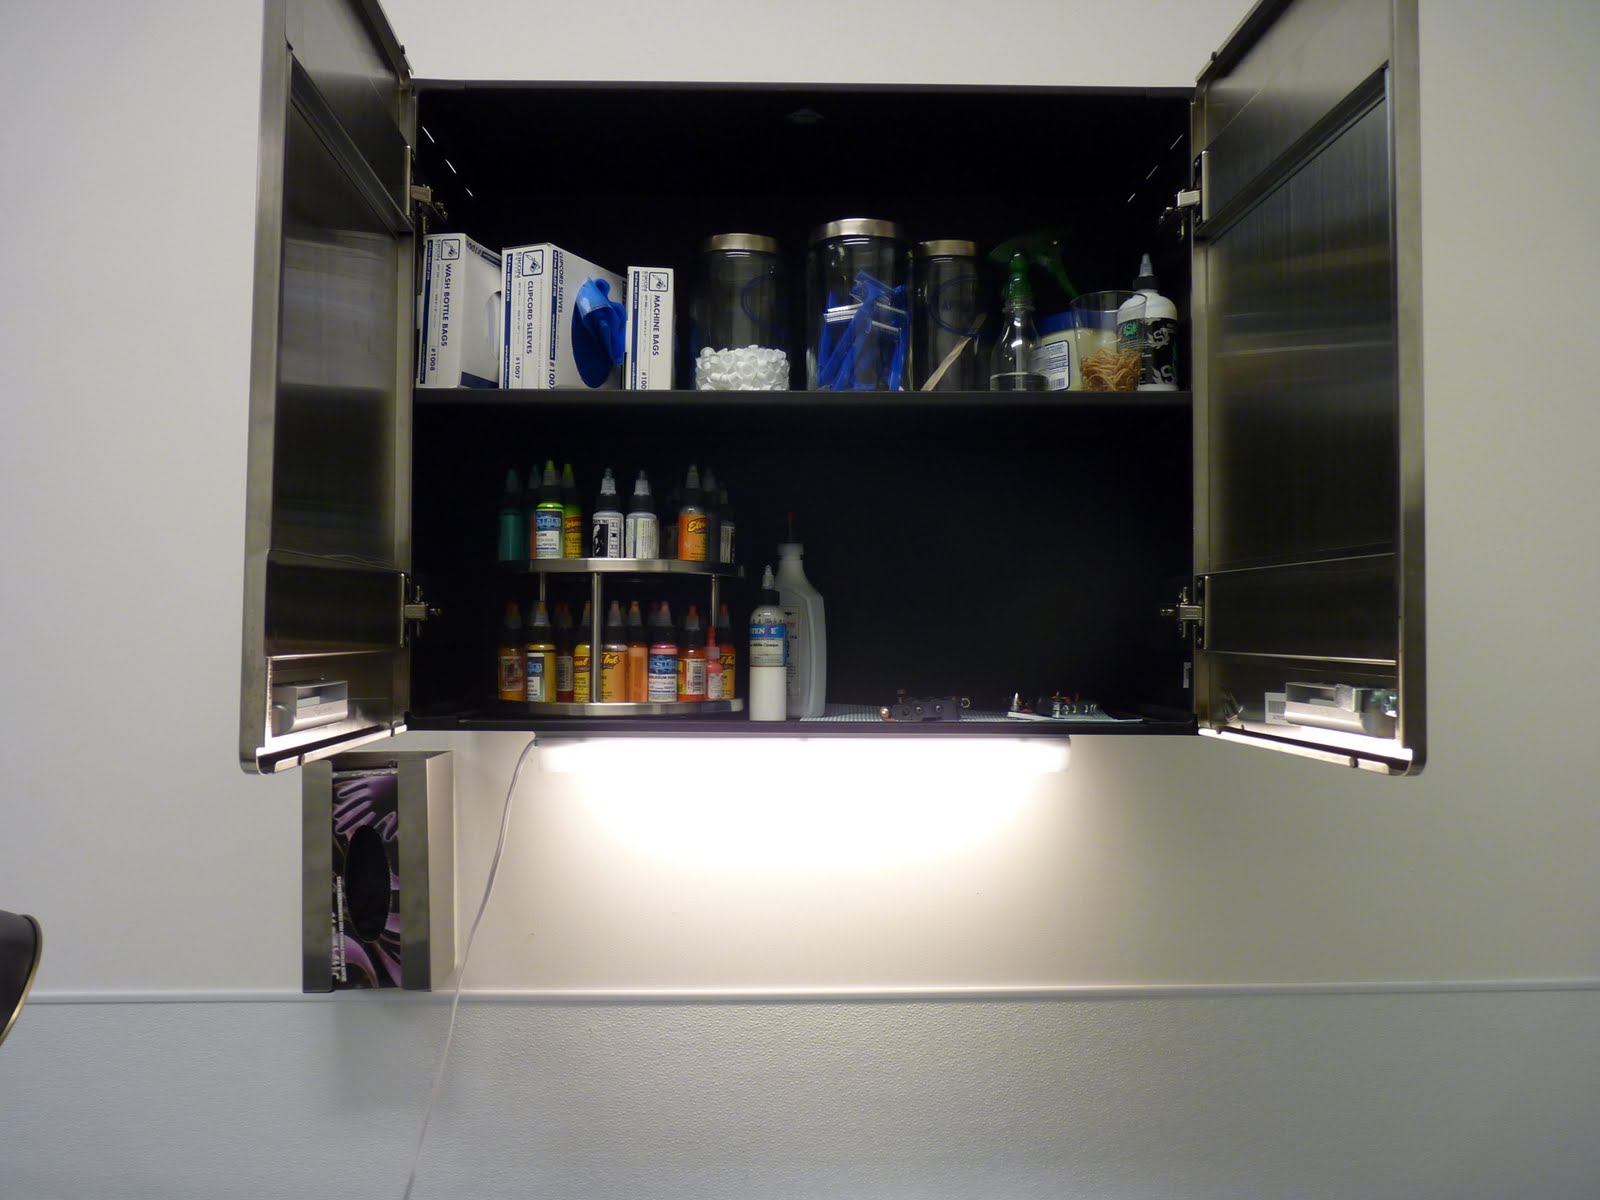
So this is a pretty basic setup for my workspace, it's what anyone should expect to see when they are getting a tattoo done in a professional environment. Any surfaces that could potentially be contaminated with ink or blood are covered. I like to keep all my supplies stored away in cabinets, and only pull out what I will use for that tattoo, keeping everything safe from possible splatter or just incidental contamination. All other surfaces are totally non-porous, including the walls, trash can, chairs, etc. This lets me fully wipe down and clean everything on a regular basis, which all helps to keep the place as clean as possible.


This is a shot of my sweet stainless steel cabinet, made my Hercke. Up top are barrier bags for machines and rinse bottles, and some more disposable supplies. Down below is something I wish I had bought FOREVER ago, which is a simple steel turntable for my inks! It makes my life SOOO much easier, everything is arranged by color and totally easily accessible. I think it was about $20 ordered from Amazon.com, definitely worth every penny. You can see a wide variety of ink in there, I tend to use a handful of brands, right now I'm using Eternal, Intenze, Fusion, Starbright, millennium, and Silverback grey wash, and Kuro Sumi black.

Ok I think that will be it for now, but I hope to actually post more often and on a consistent basis. If you stumble upon this blog and are looking for a tattoo in Portland, Oregon, shoot me an email at greg@goyotattoo.com to get in touch!

Sunday, December 19, 2010

Some new tattoos and pictures


Done quite a few upgrades to the shop including new flooring and an upgrade to FK Irons machines which has been really nice. Things are going great with the studio, I have been gradually picking up a steady stream of great clients. I am grateful to everyone who has allowed me to work with them to create something special.

Thursday, June 17, 2010

Well things are going well getting moved into the studio. I spent most of last week applying joint compound to the walls, getting them as smooth as possible and just got the first coat of primer down. I think I should be mostly moved in within a week.


One thing that I would like to use this blog for is the occasional review of tattoo gear. Sometimes it can be difficult as a tattoo artist to get good feedback on new products since there is little in the way of a network for us to rate equipment or share that kind of info. I'll start with the armrest that I just got, made by TatSoul.


If you have never struggled with the varying inefficient designs for armrests that are being sold out there, then you are a very lucky tattoo artist. Having never been completely satisfied with the armrests that I have used in the past, I was determined to go out of my way to be sure that my investment would be something that wouldn't disappoint me, and I think I may have found just that product. After reading some reccomendations on Nick Baxter's forums and watching the demonstration video on the TatSoul website, I decided to go ahead and pay the $199 + $40 shipping for a TatSoul armrest.


It arrived in a thick vinyl carrying bag of a reasonable quality and stitched with a huge TatSoul logo on the side, a nice perk to have a ready made carrying case for traveling. I habe to say that my initial impressions of this product are very positive. It is a hefty armrest made from thick, polished metal with oversized adjustment knobs and extra padding. My biggest concern with other more flimsy armrests is that they will wobble or be unstable while working so the extra thick and heavy components that the stand are made from go a long way towards alleviating those fears. TatSoul armrests use a two legged, four footed design, which is more stable than tripod or platform armrests. Adjustment knobs are oversized and flat which means they can be covered with barrier film for at work adjusments if needed. Finally, the pad is super thick and comfortable which will open the door to using this "arm" rest in creative ways that wouldn't be possible with a typical design.


My final verdict is that this was absolutely worth the $240 I paid for it, and I would recommend this purchase to any artist that is unhappy with their current armrest. I hope TatSoul continues to produce products with this high level of craftsmanship.


Monday, June 7, 2010

Well the day has finally come! Paperwork is signed and I am "moving" into my new unit. It's old inhabitants, the One Stop Sustainability Shop apparently weren't too concerned with having smooth, blemish free walls. Luckily one of my new neighbors Darryl (sp?) stopped by to say hi and noticed my feeble attempts at plastering and sanding. Having spent weeks finishing and smoothing the walls of his own unit, he gave me a quick tutorial and even let me borrow a very nice putty knife. The woman with him who's name I didn't catch called him the "Plaster Master," but his real job is making amps.

Here are some Hipstamatically enhanced images of the space, hopefully it's starkness will be a little more interesting this way. Expect big changes coming in the near future and maybe a review of my new armrest tomorrow...